
TL;DR
A closet can work as a vocal booth if you focus on strategic placement, basic acoustic treatment, and proper ventilation. It’s about reducing reflections and controlling low frequencies, not complete soundproofing. With the right approach, you get cleaner recordings and less noise leakage.
Ever wondered if that tiny closet could be your next vocal booth? It can — if you know the tricks to dampen reflections and manage noise. Most creators jump straight to foam panels, but the real magic happens with placement and sealing gaps.
This isn’t about turning your closet into a soundproof vault. It’s about making a focused, controlled space where your voice shines and external noise fades. Let’s explore how to get the most out of a small room without breaking the bank or tearing down walls.
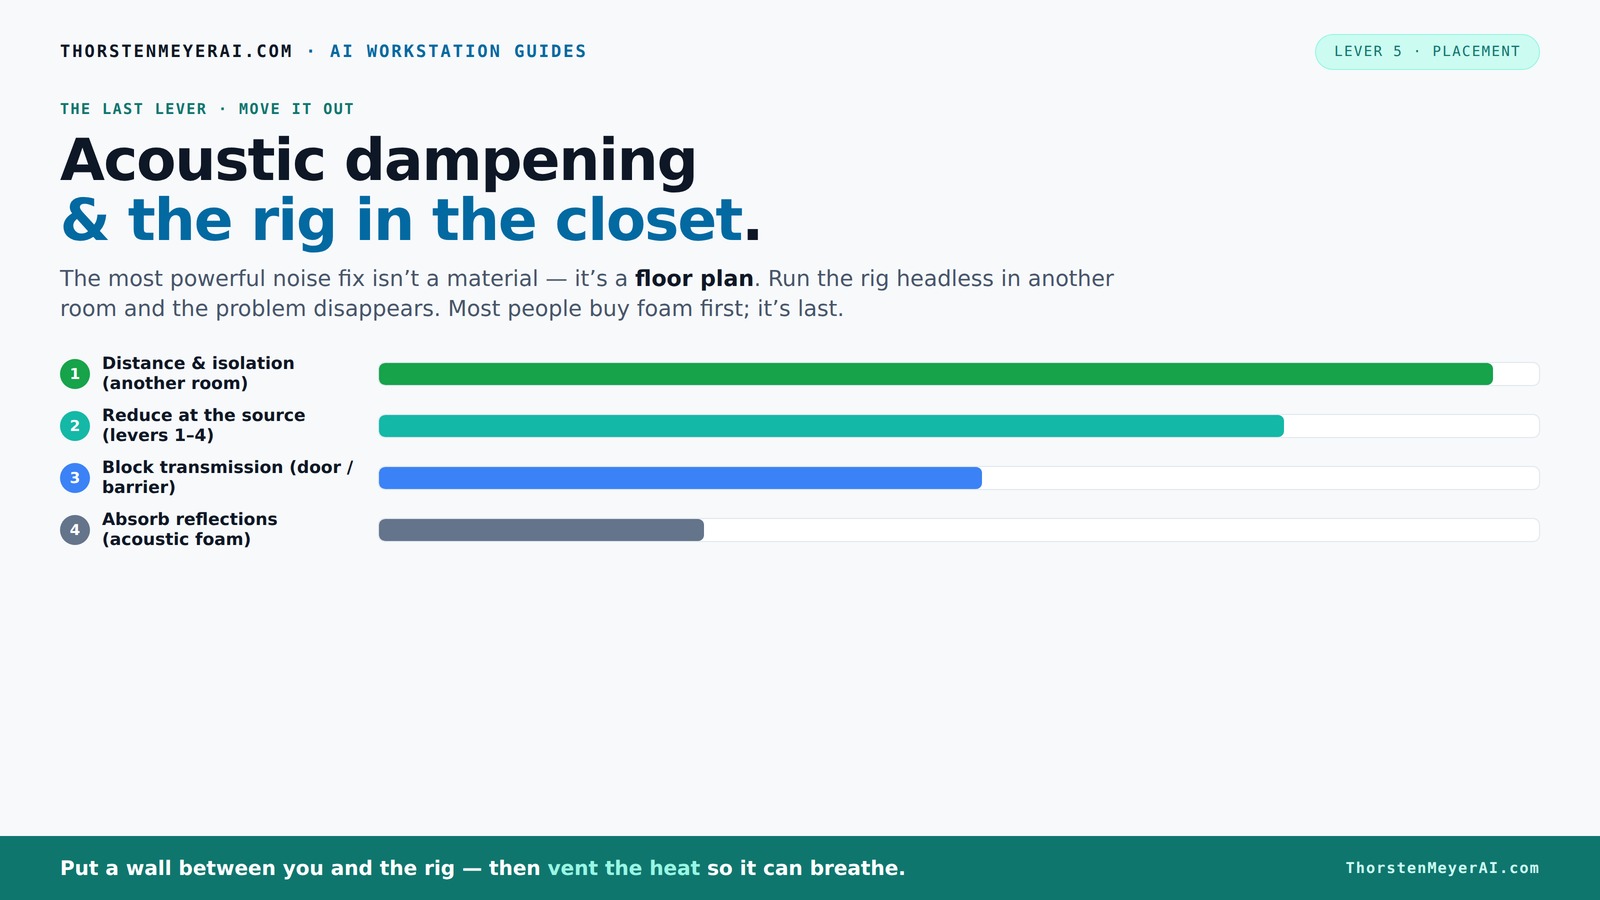
Acoustic dampening
& the rig in the closet.
The most powerful noise fix isn’t a material — it’s a floor plan. A rig you can’t hear because it’s in another room beats any amount of foam. Tap the approaches in Part 1 to see what actually works.
(another room)
(levers 1–4)
(door / barrier)
(acoustic foam)
Contain the noise, not the heat
Key Takeaways
- Focus on placement: treating reflection points and corners yields the biggest sound improvements.
- Seal gaps around doors and cracks — even tiny leaks let sound escape and ruin your efforts.
- A closet can be a great mini studio if it’s well-ventilated and treated for reflections, not just sealed for soundproofing.
- DIY solutions like blankets and leftover foam are effective, budget-friendly options for small setups.
- Don’t forget to manage heat — proper ventilation keeps your rig cool and quiet, preventing thermal throttling and noise.
acoustic foam panels for home studio
As an affiliate, we earn on qualifying purchases.
As an affiliate, we earn on qualifying purchases.
Why a closet isn't just a tiny box — it’s a sound playground
Yes, a closet is small. But that’s actually a huge advantage for sound. It limits echo and reverb naturally, creating a more focused environment for vocals or voice-over. Think of it like a mini cave that can trap your voice and keep it clean.
For example, a creator in a tiny walk-in closet reported a 60% drop in reverb after just adding a rug and a few foam panels at reflection points. The key is understanding what sound treatment actually does — and what it doesn’t.
Acoustic dampening vs. soundproofing: what really matters in a closet
Acoustic dampening is about reducing echoes and reflections inside a space. Soundproofing aims to block noise from escaping or entering. In a closet, your main goal is dampening — making your voice clearer and reducing room echo.
Foam panels and diffusers absorb sound waves bouncing within the space, which prevents the room from coloring your recordings with reverb and echoes. However, they won’t stop external sounds from seeping in — like traffic or neighbors’ noise — because that requires sealing gaps and adding barriers. Understanding this tradeoff is crucial: if you only dampen, you improve clarity but may still hear outside noise. Conversely, full soundproofing is often costly and complex, so focusing on dampening offers a practical middle ground for small spaces.
Most DIY closet setups prioritize dampening because it provides significant improvements in recording quality without the expense and effort of full soundproofing. Recognizing this distinction helps set realistic expectations and guides you to the right solutions based on your needs.
Placement is king: where to position treatment and your mic
Placement of your microphone and acoustic treatment has a bigger impact than just stuffing panels everywhere. Start by positioning your mic at the reflection point — usually directly in front of your mouth and a few inches away from a wall that causes echo.
Next, treat the first reflection points on the walls behind and beside the mic. Use a mirror to find these spots — if you see your reflection in the mirror from your mic position, that’s a prime candidate for treatment.
Proper placement isn’t just about reducing echo; it’s about capturing a clean, natural sound that reflects your voice accurately. When you position your mic correctly and treat the key reflection points, you minimize unwanted room coloration, making your recordings sound more professional and easier to edit. For instance, a voice-over artist placed foam panels at the wall behind the mic and at the first reflection point, dramatically reducing room reverb and making editing easier. This strategic approach ensures that your treatment targets the most problematic areas, avoiding unnecessary clutter and expense while maximizing acoustic benefits.
Sealing gaps and treating doors: stop sound leaks at the weak points
Gaps around closet doors and cracks are common weak spots. Air escapes and sound leaks through these tiny openings, defeating your efforts to keep noise contained.
Weatherstripping, acoustic sealant, or blankets over the door can make a huge difference. For example, sealing a closet door with weatherstripping reduced noise leakage by around 40%, according to DIY soundproofing tests.
Remember, even small cracks matter — every little gap lets sound pass through, so sealing every opening is worth the effort. This is especially important if you’re recording at high volumes or trying to isolate your voice from external noise. Properly sealing these leaks prevents sound from escaping and external noise from seeping in, which can compromise recording clarity and create unwanted background noise in your recordings. The tradeoff is that over-sealing or using heavy barriers might slightly muffle your voice if not done carefully. Striking a balance between sound isolation and natural sound is key to effective treatment.
Treating low frequencies: do you need bass traps in a tiny closet?
Low-frequency buildup is real — parallel walls and small spaces amplify bass sounds, making your voice muddy or boomy. Bass traps are designed to absorb these deep sounds, but in a tiny closet, they can be overkill unless you notice a problem.
For example, a creator reported that adding a bass trap in the corner helped tame a “boomy” sound, but in most small spaces, a thick panel or even a blanket can suffice. The key is to identify whether low-end issues are affecting your recordings, such as muffled or boomy vocals, which can obscure clarity and make editing more difficult. If you do notice problematic low frequencies, adding bass traps at corners can be a game-changer, but they should be used judiciously. Overdoing bass trapping in a tiny space can make the room feel overly dead or unnatural, so consider the specific sound characteristics of your space before investing.
Think of bass traps as the spice — use them if you hear low-end issues, but don’t overdo it in a tiny room. Focus on targeted placement and testing to determine if they’re necessary.
DIY vs. pro: building your closet booth on a budget
You don’t need fancy equipment to create a functional closet booth. In fact, many successful creators start with blankets, pillows, and leftover foam from other projects.
For example, hanging blankets from a tension rod or using foam panels cut from old mattresses can instantly improve sound quality without breaking the bank.
Upgrade over time: add a proper mic stand, better panels, and sealing as your budget allows. A good rule: treat reflection points first, then seal gaps, then add absorption where needed. This step-by-step approach allows you to improve your space gradually while understanding what makes the biggest difference. It’s about making smart choices that yield noticeable results without overspending. The key is to prioritize treatment of reflection points and sealing leaks first, then enhance absorption as needed based on your specific sound issues.
Ventilation and heat: keeping your closet rig cool and quiet
Placing a hot, high-performance computer or GPU in a closet sounds great for noise reduction — but heat buildup is a real concern. Without airflow, your machine can overheat, throttle, and create even more noise.
Use active ventilation: a quiet exhaust fan pulling hot air out and bringing in cooler air keeps temperatures stable. For instance, a small inline fan can cut closet temperatures by 15°C, preventing thermal throttling and excessive fan noise.
Learn more about balancing cooling and noise from dedicated solutions like soundproof cabinets with ducted airflow, or consider external heat exhausts. Proper ventilation not only prevents overheating but also ensures your equipment runs efficiently, avoiding thermal noise caused by fan strain. The tradeoff is that adding ventilation can sometimes introduce new noise pathways if not carefully implemented. Choosing quiet fans and sealing duct connections properly helps maintain a quiet environment while keeping your rig cool.
Frequently Asked Questions
Can a closet really work as a vocal booth?
Absolutely. Small, enclosed spaces naturally reduce echo and reverb, especially if you add some treatment at reflection points and seal gaps. It’s a low-cost way to get cleaner recordings without building a dedicated studio.What is the difference between acoustic dampening and soundproofing?
Dampening reduces internal echoes and reflections, making your recordings clearer. Soundproofing blocks outside noise from entering or leaving. In a closet, dampening is the main focus, since full soundproofing is often impractical.Where should I place acoustic panels in a closet booth?
Start with the reflection points: the wall directly behind your mic and the walls beside it. Use a mirror to locate these spots. Also, treat the ceiling and door gaps for best results.Do I need bass traps in a tiny closet?
Only if you notice a boomy or muddy low end. Small closets can amplify bass, but often thicker panels or blankets are enough. Use bass traps selectively based on your sound test.How much foam or absorption do I need?
Treat the main reflection points and corners. You don’t need to cover every inch; a few well-placed panels make a big difference. Focus on the areas that cause the most echo or reverb.Conclusion
Your closet isn’t just a tiny box — it’s a powerful tool for controlling sound. A little strategic placement, sealing, and treatment turn it into a focused, quiet space that makes your recordings clearer and more professional.
Remember, the goal isn’t perfection but smart, practical tweaks that give you big results. So, grab some blankets, seal those gaps, and start turning that closet into your secret studio.