
To replace weather stripping and seals, start by inspecting your doors and windows for gaps, tears, or drafts. Remove the old stripping carefully with a utility knife or putty knife and clean the area thoroughly. Measure and cut new weather stripping to fit, then press or slide it into place along the edges, ensuring a snug fit. Don’t forget to test for leaks afterward and adjust if needed. If you keep going, you’ll learn how to do it efficiently and effectively.
Key Takeaways
- Inspect weather stripping for gaps, tears, or damage to determine if replacement is needed.
- Carefully remove old weather stripping using a utility knife or putty knife without damaging the door frame.
- Measure and cut new weather stripping to fit the door frame or storm door perimeter accurately.
- Install the new weather stripping firmly along the edges, ensuring proper fit and coverage for an effective seal.
- Test for leaks by closing the door and feeling for drafts, then readjust or add strips as necessary.
Weather stripping and seals are essential for keeping your home energy-efficient and comfortable, especially as they wear out over time. When these components begin to deteriorate, you might notice drafts creeping in around doors and windows, making your heating or cooling efforts less effective. One common area where this occurs is on your storm door. Storm doors are designed to provide an extra barrier against the elements, but if the weather stripping around them becomes cracked or loose, they won’t do their job properly. Replacing worn weather stripping on your storm door is a straightforward way to improve draft prevention and keep the indoor temperature stable.
Replacing worn weather stripping on your storm door enhances energy efficiency and prevents drafts effectively.
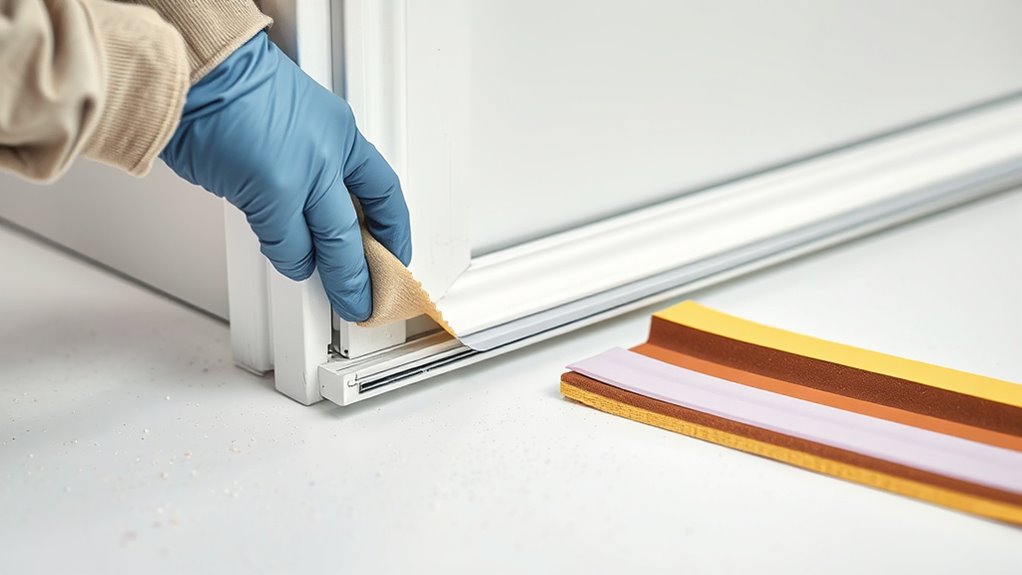
To start, inspect your storm door carefully. Look for any gaps, tears, or areas where the weather stripping has come loose. If you notice any of these signs, it’s time for a replacement. You’ll want to remove the old weather stripping completely before installing new material. Use a utility knife or putty knife to gently pry it off, taking care not to damage the door frame. Once the old seal is removed, clean the area thoroughly to ensure the new weather stripping adheres properly. Dust, dirt, or residue can prevent a tight seal, reducing the effectiveness of draft prevention. Regular maintenance and timely replacement ensure your weather stripping performs optimally and prolongs its lifespan.
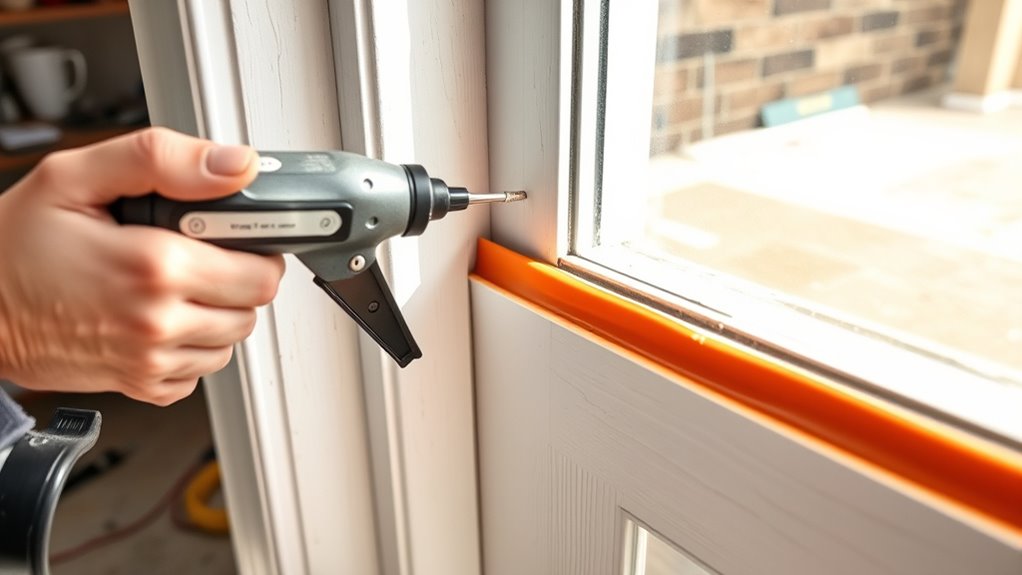
Next, choose the right type of weather stripping for your storm door. There are various options, such as foam tape, rubber gaskets, or silicone weather seal strips. For storm doors, a durable rubber or vinyl seal often works best because it withstands frequent use and exposure to weather. Measure the length of the existing weather stripping to get an accurate size, or simply measure the perimeter of your door frame. Cut the new weather stripping to size, and then carefully press or slide it into place along the door frame or the edge of the storm door itself.
Once installed, close the storm door and check for gaps or areas where the seal might still be letting drafts in. Run your hand along the edges to feel for any air leaks. If you find any, readjust the weather stripping or add extra strips to improve coverage. Proper installation will markedly enhance draft prevention, helping your home stay warmer in winter and cooler in summer. Regularly inspecting and replacing weather stripping on your storm door ensures it continues to serve its purpose effectively, saving you money on energy bills and increasing your comfort year-round. Proper weather sealing not only improves energy efficiency but also extends the life of your door components.

ItranMc Front Door Window Weatherstrip Kit,Window Molding Sweep Felt Trim Seal & Run Channel Rubber Seals for 1987-1997 Ford F150 F250 F350 Bronco#E7TZ1521452A E7TZ1521453A F2TZ1521456A F2TZ1521457A
【Vehicle Compatibility】6PCS Weather Strip Kit. Compatible with 1987-1996 Ford F150 | 1987-1997 Ford F250 | 1987-1997 Ford F350…
As an affiliate, we earn on qualifying purchases.
As an affiliate, we earn on qualifying purchases.
Frequently Asked Questions
How Often Should Weather Stripping Be Replaced?
You should replace weather stripping and seals when you notice drafts, increased energy bills, or visible damage. Typically, it’s a good idea to check them annually and replace every few years, depending on wear. Follow installation tips like cleaning surfaces thoroughly and sealing gaps properly. Using effective sealing techniques guarantees your home stays insulated. Regular inspections help you catch issues early, keeping your home energy-efficient and comfortable year-round.
Can I Install Weather Stripping Myself?
Think of installing weather stripping like fitting a key into a lock—you can often do it yourself to save time and money. With DIY installation, you get the satisfaction of sealing your home efficiently. However, if you’re unsure or want a perfect fit, professional help guarantees the job’s done right. Either way, you’ll improve your home’s comfort and energy efficiency by choosing the approach that suits your skills.
What Types of Weather Stripping Are Best for Doors?
The best weather stripping for doors includes door sweeps, V-strip, and foam tape, as they effectively insulate and prevent drafts. You should choose based on your door’s material and the level of draft prevention needed. For ideal door insulation, make certain the weather stripping fits snugly and seals all gaps. This way, you’ll keep your space warmer, reduce energy costs, and enjoy a more comfortable environment year-round.
How Do I Know if Seals Are Damaged?
You can tell if seals are damaged by looking for clear damage indicators like cracks, tears, or gaps. Seal deterioration often results in drafts, uneven temperatures, or increased energy bills. If you notice light coming through around the edges or feel cold spots near your doors or windows, it’s a sign that damage indicators are present. Regular inspections help catch seal deterioration early, saving you from higher energy costs later.
Will Replacing Seals Improve Energy Efficiency?
Replacing seals definitely improves energy efficiency. Imagine a homeowner who updates their drafty windows’ seals; they notice the house stays warmer and their energy bills drop. Seal maintenance prevents air leaks, reducing heating and cooling costs. By sealing gaps properly, you enhance energy savings and comfort. So, if your seals are damaged or old, replacing them is a smart step towards better insulation and lower energy bills.

118” Wedge-Shape Foam Window Weather Stripping Door Seal Strip,Soundproofing Frame Winter Insulation Tape for Exterior Front Door,Noise Cancelling Window Inserts,Door Gap Filler Light Blocker,White
Upgraded Wedge Design: This window draft stopper features an upgraded wedge design, tapering from 5/32" to 11/32" (0.16"–0.35")…
As an affiliate, we earn on qualifying purchases.
As an affiliate, we earn on qualifying purchases.
Conclusion
Replacing weather stripping and seals keeps your home cozy, saves energy, and prevents drafts. It’s a simple task that improves comfort, enhances efficiency, and protects your investment. When you replace weather stripping and seals, you create a more comfortable space, save money on energy bills, and prevent unwanted drafts. Stay proactive, stay warm, and enjoy the benefits of a well-sealed home. Because when you take care of your home, you enjoy comfort, savings, and peace of mind.
Storm Door Sweep Replacement for Larson & Pella Storm Door Expander Sweep, for Vinyl and Metal Door Sweep Assembly- 2 Specifications Storm Door Seal Rubber Strip
Seal Dustproof Insulation — Storm door expander sweep is used on the inside of the door to keep…
As an affiliate, we earn on qualifying purchases.
As an affiliate, we earn on qualifying purchases.

Frost King R734H Sponge Rubber Foam Tape 3/4" W X 7/16" H X 10' L, Black
The product is 3/4×7/16 BLK SpongeTape
As an affiliate, we earn on qualifying purchases.
As an affiliate, we earn on qualifying purchases.