
To build cold frames for extra growing space, start by choosing a sunny, sheltered spot in your yard. Use affordable materials like reclaimed wood, pallets, or cinder blocks for the sides, and old windows or polycarbonate sheets for the transparent lid. Make sure the frame is insulated, slightly elevated, and easy to open for ventilation. Proper placement and construction can extend your growing season considerably—keep exploring for detailed steps to create your ideal cold frame setup.
Key Takeaways
- Choose a sunny, sheltered location facing south to maximize sunlight and warmth.
- Build a sturdy, insulated frame using affordable materials like reclaimed wood, pallets, or cinder blocks.
- Use transparent covers such as old windows or polycarbonate panels for the lid to trap heat effectively.
- Ensure the cold frame is slightly elevated for better drainage and air circulation.
- Include hinges for ventilation and regularly check for weatherproofing to maintain optimal growing conditions.

If you’re looking to extend your growing season, building a cold frame is an excellent way to protect your plants from chilly weather. Cold frames create a microclimate that traps warmth, allowing you to start seedlings earlier in spring and harvest later into fall. They’re a cost-effective solution for gardeners enthusiastic to maximize their outdoor space without relying on expensive greenhouse setups. The key to a successful cold frame lies in proper design and construction, which you can achieve using simple DIY materials you likely already have or can easily acquire.
Build a cold frame to extend your growing season and protect plants from the cold.
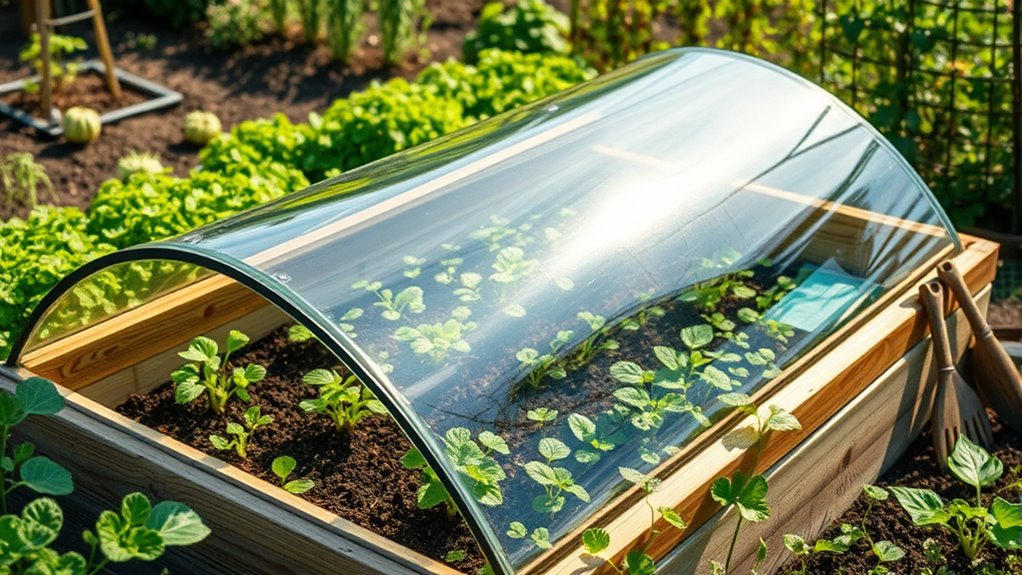
To begin, you’ll want to plan your cold frame’s size based on the space you have and the types of plants you’re growing. Most DIY cold frames are rectangular and low-profile but can be customized to fit your needs. The main components include a sturdy base, sides, and a transparent lid or cover. For the frame, you might use materials like wooden pallets, reclaimed wood, or cinder blocks for the sides. These materials are affordable, easy to work with, and readily available at hardware stores or salvage yards. Wooden frames are popular because they insulate well and are easy to modify, but confirm the wood is untreated to prevent chemical leaching.
For the lid, the most vital part of the season extension, clear materials are essential. You can use old windows, acrylic panels, or polycarbonate sheets. These DIY materials are lightweight, durable, and allow maximum sunlight to reach your plants. When constructing the top, hinge it securely to the sides so you can open and close it as needed for ventilation or harvesting. Be sure to seal any gaps to retain heat and prevent cold drafts from entering. Proper ventilation is crucial to prevent overheating and maintain healthy plant growth inside the cold frame.
Position your cold frame in a sunny, sheltered location, ideally facing south to maximize sun exposure. Elevate it slightly off the ground to improve drainage and air circulation underneath. If you’re using wood, treat it with a non-toxic sealant to resist moisture and prolong durability. Fill the inside with your chosen soil or mulch, and plant your seedlings or young plants inside. When the temperature drops, the cold frame acts as an insulator, trapping heat during the day and keeping plants warm overnight.
Building your own cold frame using DIY materials not only saves money but also gives you a sense of accomplishment and control over your gardening environment. It’s a practical, versatile way to extend your growing season, allowing you to experiment with different crops and get more out of your garden. With a little effort and some basic tools, you’ll create an effective, personalized cold frame that boosts your gardening success year-round.

Outsunny Raised Garden Bed with Polycarbonate Greenhouse, Wooden Garden Cold Frame Greenhouse, Flower Planter Protection, 48" x 24" x 32", Natural
Dual Use: This raised garden bed comes with a cover system. You can use the portable greenhouse cover…
As an affiliate, we earn on qualifying purchases.
As an affiliate, we earn on qualifying purchases.
Frequently Asked Questions
What Materials Are Best for Insulating Cold Frames?
You should choose materials with excellent insulation techniques and durability for cold frames. Polycarbonate or thick polycarbonate panels are ideal because they insulate well and resist impact. Double-glazed glass or acrylic also work, providing good insulation and lasting durability. Wooden frames with insulated panels are affordable and effective, but guarantee the wood is treated to withstand moisture. Overall, select materials that combine good insulation with long-term durability to keep your plants warm.
How Do I Prevent Pests From Entering Cold Frames?
Did you know that pests can reduce your plant yield by up to 50%? To prevent pests from entering your cold frame, use pest proof netting over vents and openings. Seal gaps around the frame with weatherproof caulk or foam to block entry points. Regularly inspect for and repair any new holes or tears. These simple steps will help keep pests out and ensure healthy, thriving plants inside your cold frame.
Can Cold Frames Be Automated for Watering and Heating?
Yes, you can automate your cold frames with watering and heating systems. Installing automated watering systems like drip emitters or timers guarantees your plants stay consistently hydrated without manual effort. For heating, consider electric or solar-powered heating systems that activate when temperatures drop, maintaining ideal conditions. These setups save you time, reduce manual labor, and help keep your plants healthy during colder months.
What Is the Ideal Size for a Beginner’s Cold Frame?
Think of a cozy, vintage suitcase—you’d want something similar in size for your beginner’s cold frame. In temperate climates, a 3 to 4-foot long, 2-foot wide, and 1 to 1.5-foot tall frame works well. It’s manageable and provides enough space for seedlings. You can also explore container options, like wooden or plastic frames, which are easy to build and perfect for small-scale gardening adventures.
How Do I Extend the Growing Season Using Cold Frames?
You can extend your growing season by using cold frames to protect plants early in spring and late into fall. By maintaining consistent temperature control, you create a microclimate for season extension. Incorporate crop rotation to prevent soil depletion and pests, ensuring healthy growth. Regularly ventilate and monitor your cold frames, allowing you to maximize your growing window and enjoy fresh produce longer into the year.

Transparent Polycarbonate Roof Sheet, Acrylic Glass Panels, Pc Endurance Board, Roof Covers, Anti-uv/Waterproof Awnings, Clear Plastic Sheets for Cold Frame Greenhouses Shed,WxL-1x1m/3.3 * 3.3ft
✔Sturdy and durable: transparent roofing sheet are made of high quality polycarbonate, environmentally friendly material, 1mm thickness, double-sided…
As an affiliate, we earn on qualifying purchases.
As an affiliate, we earn on qualifying purchases.
Conclusion
Now, picture yourself stepping into your cozy cold frame, sunlight casting a warm glow through the glass. As you gently tend to your thriving greens and tender seedlings, you watch them flourish in their protected oasis. Your DIY cold frame isn’t just extra space; it’s a haven of growth and hope, turning your garden into a lush, vibrant escape even on chilly days. With each harvest, you’ll feel proud of your simple, rewarding creation.
Frame for 22071 Cold Concept Tray – 17 3/4"W x 9 3/4"D x 1 1/2"H, Reclaimed Wood
As an affiliate, we earn on qualifying purchases.
As an affiliate, we earn on qualifying purchases.

UtySty 50 Pack Easel Hinge Replacement Picture Frame Back Stand Mounting Bracket Butterfly Hinges for Display Photo Frame Folding Feet Support Cardboard Connector Mount Screw-Free
Package Contents: 50 pcs Photo Frame Back Hinge
As an affiliate, we earn on qualifying purchases.
As an affiliate, we earn on qualifying purchases.